HawkScan and Atlassian Bamboo
This guide will show you how to run HawkScan against your application in Atlassian Bamboo. We skip over the build and deploy phases and focus on the scan itself. We assume that you can either deploy your app to an integration environment available to your Bamboo build agent, or run it directly on the build agent for testing.
Protect Your API Key
For starters, store your StackHawk API key as a secret variable in Bamboo. From the Bamboo console, select Administration (⚙️) → Global variables.
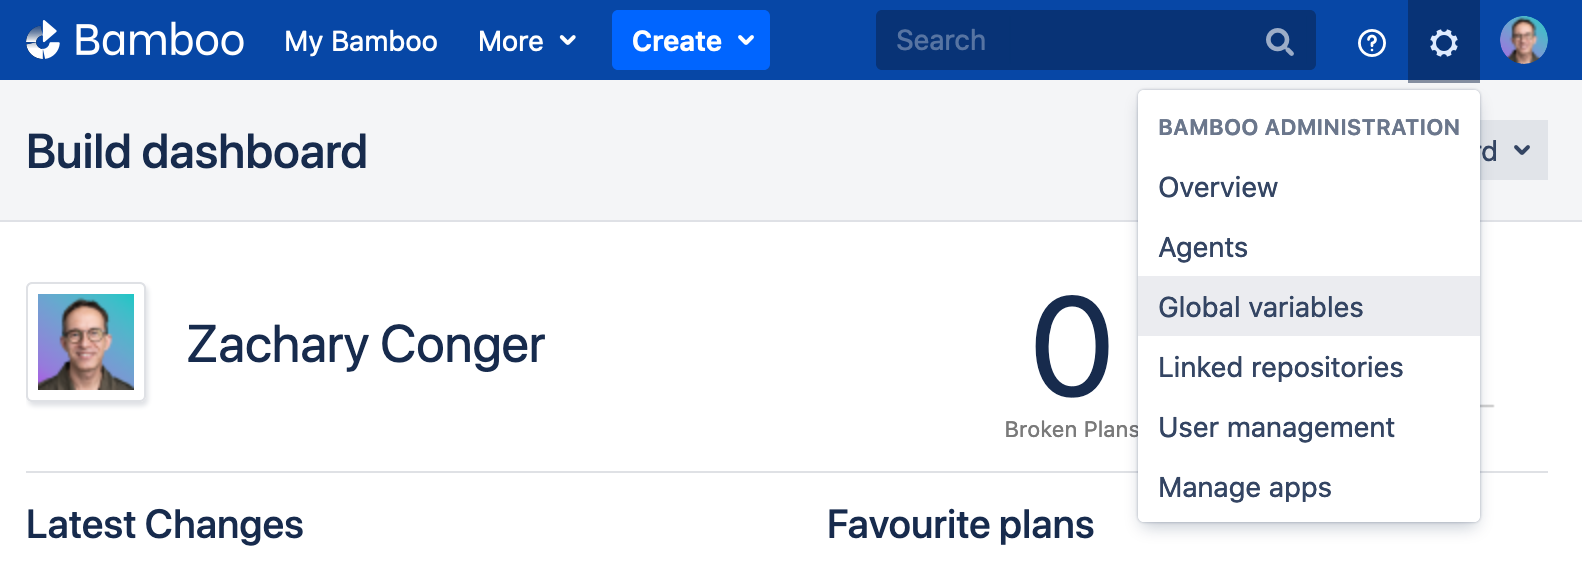 |
Add a variable called secret_hawk_api_key and save your API key as the value, like so.
 |
Prepend the variable name with secret, so that Bamboo will hide the value in the console and logs.
Create a Repository
Create a Git repository to store your configuration files related to this guide. In Bamboo, add a link to this repository by following the steps under Administration (⚙️) → Linked repositories.
For your real-world projects, all of the configuration files we describe below would normally go into your application’s project repository.
Scenarios
We describe Bamboo jobs to scan your app in three different scenarios:
- Scenario 1: Scan an established integration environment accessible to your Bamboo agent
- Scenario 2: Scan your app running on the Bamboo agent and listening on the localhost address
- Scenario 3: Scan your app in the context of a Docker Compose set of containers
Scenario 1: Scan an Integration Environment
In this scenario we scan an app in an established environment where Bamboo has deployed your application for integration testing. We will use the public website, example.com, to represent that environment.
Create a new Bamboo build plan called “Scan an Integration Environment”, and link it to the repository you linked above.
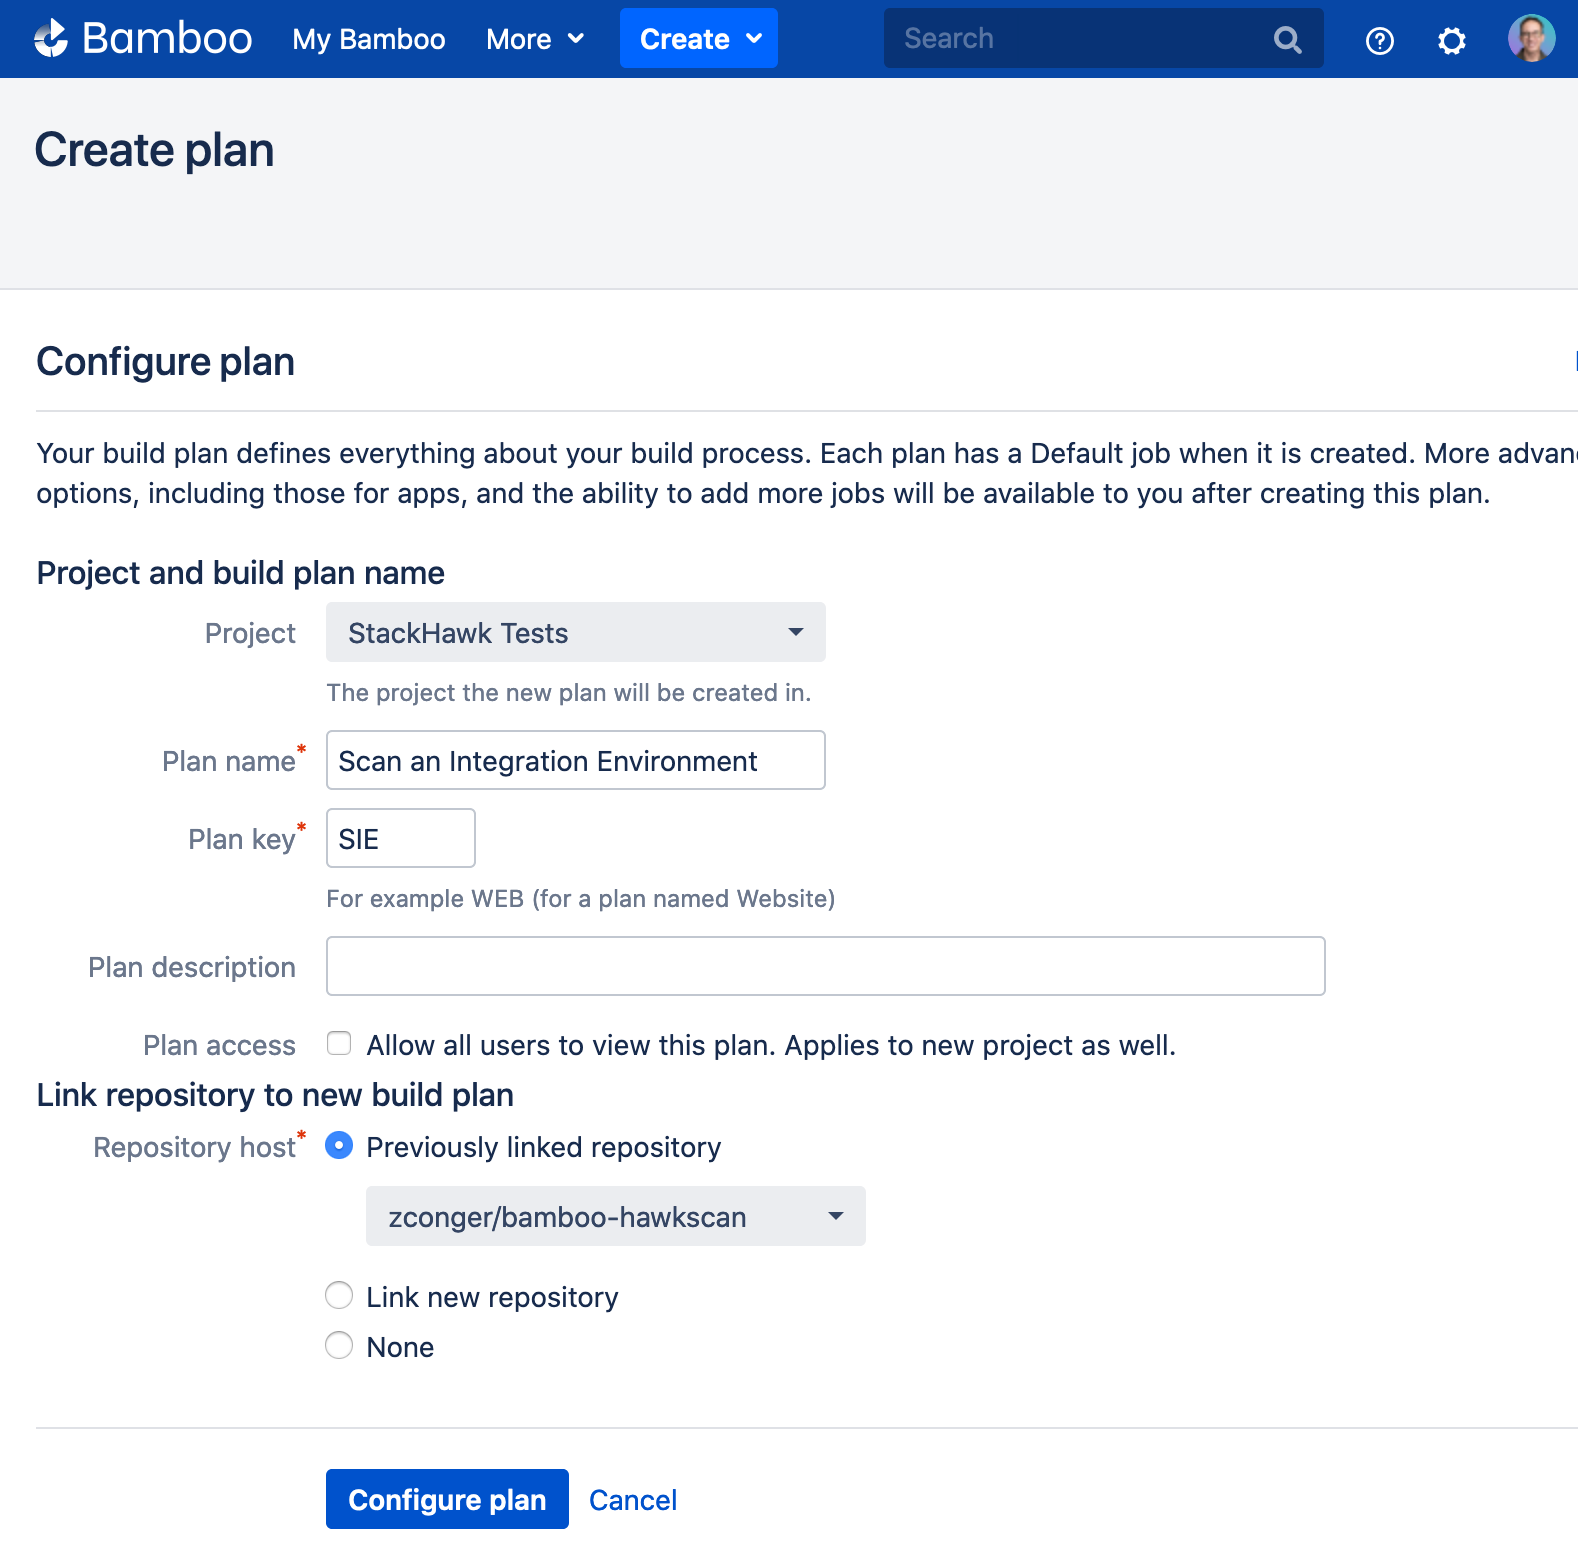 |
Configure the new plan.
Task: Run HawkScan
In the default job, add a new Docker task.
In the Docker task configuration, under Command, select Run a Docker container. Under Docker image, enter, stackhawk/hawkscan. And under Environment variables, enter API_KEY="${bamboo.secret_hawk_api_key}" This will pass the private API key variable to HawkScan to allow it to connect to the StackHawk platform.
Under Container working directory, replace the default value with /hawk. And under Volumes, replace the default Container data volume value with /hawk. Save your task configuration. It should look like this:
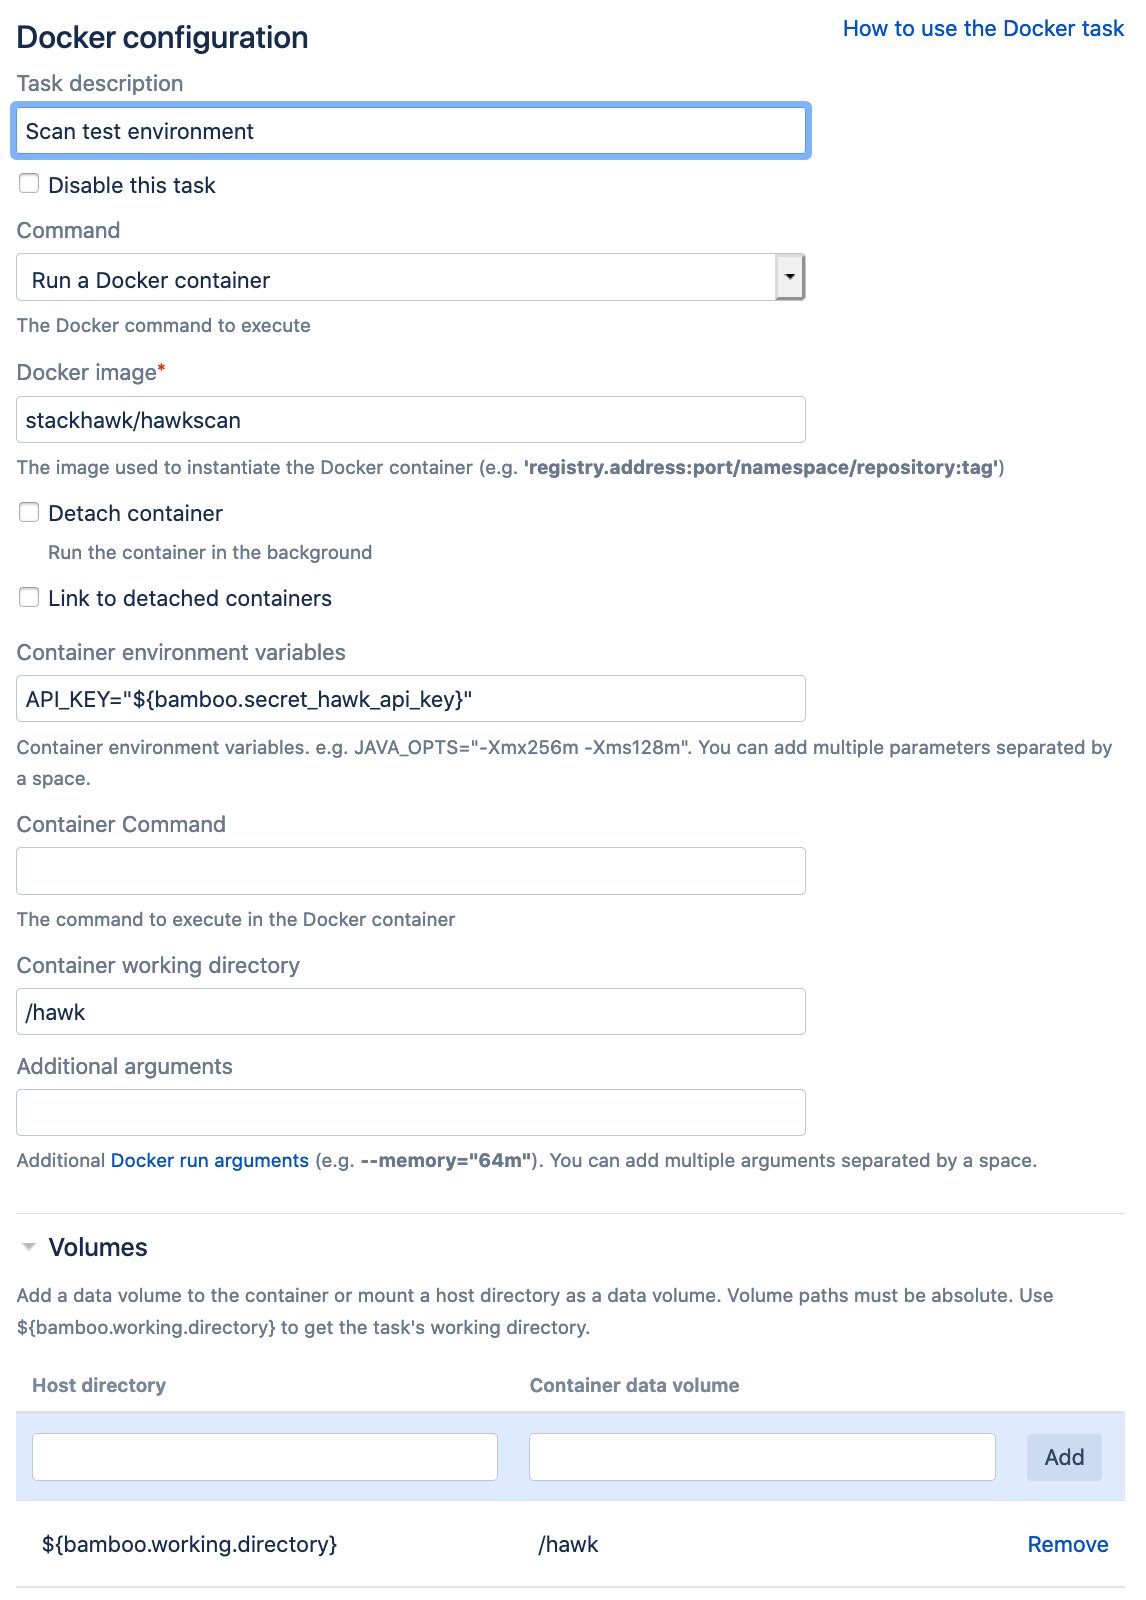 |
Configure HawkScan
From the StackHawk app, navigate to Applications, and create a new application called Example.
In your test repository, create a new HawkScan configuration file, and add the following contents:
stackhawk.yml
app:
  applicationId: xxXXXXXX-xXXX-xxXX-XXxX-xXXxxXXXXxXX
  host: http://example.com
  env: Development
Replace the value of app.applicationId with the applicationId you just created in the StackHawk platform. Commit and push this change to your repository.
Run It
Now run your new Bamboo plan and watch the progress from the Bamboo console. You should see the HawkScan container run and print out a summary of results, including a link to your scan results in the StackHawk platform. Success! Check for your scan results in the StackHawk app.
Scenario 2: Scan Localhost
In this scenario we scan a service running directly on the Bamboo agent and listening on a localhost address.
Create a new Bamboo build plan called “Scan Localhost”, and link it to your repository.
Configure the new plan as follows.
Task 1: Run a Local Service
In the first task we will run a service on the localhost address. This could be any service, but to simplify the configuration, we will use an Nginx Docker container, which exposes a simple web server.
Create a new Docker task. In the task configuration, under Command, select Run a Docker container. Under Docker image, enter, nginx. Check the box for Detach container. Under Container name, enter nginx_localhost. Under Port mappings, set Host to 8080, and Container to 80. Check the box for Wait for service to start.
Your new task should look like this.
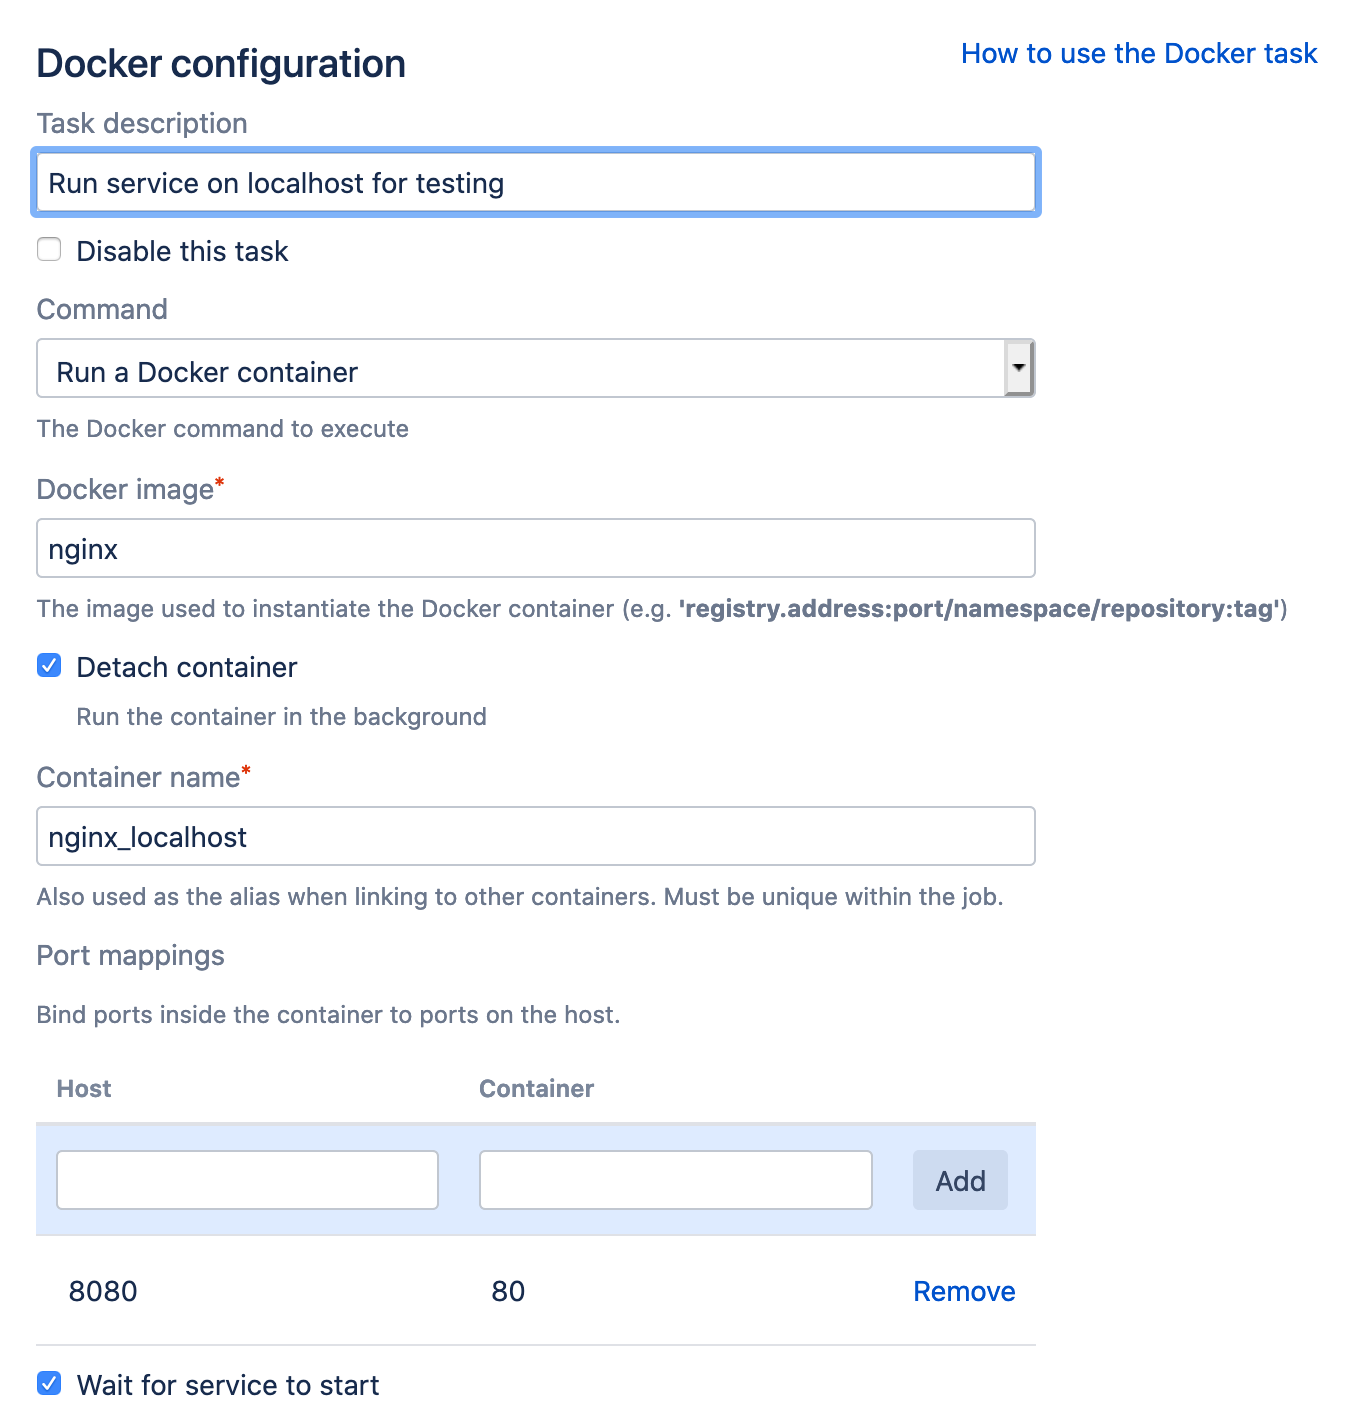 |
Leave the rest of the options set to their defaults.
Task 2: Run HawkScan
In the Docker task configuration, under Command, select Run a Docker container. Under Docker image, enter, stackhawk/hawkscan. And under Environment variables, enter API_KEY="${bamboo.secret_hawk_api_key}" This will pass the private API key variable to HawkScan to allow it to connect to the StackHawk platform.
Under Container working directory, replace the default value with /hawk. And under Volumes, replace the default Container data volume value with /hawk. Save your task configuration. It should look like this:
 |
Configure HawkScan
From the StackHawk app, navigate to Applications, and create a new application called Localhost.
In your test repository, create or modify your HawkScan configuration file, and add the following contents:
stackhawk.yml
app:
  applicationId: xxXXXXXX-xXXX-xxXX-XXxX-xXXxxXXXXxXX
  host: http://localhost:8080
  env: Development
Replace the value of app.applicationId with the applicationId you just created in the StackHawk platform. Commit and push this change to your repository.
Run It
Now run your new Bamboo plan and watch the progress from the Bamboo console. You should see the HawkScan container run and print out a summary of results, including a link to your scan results in the StackHawk platform. Awesome! Check for your scan results in the StackHawk app.
Scenario 3: Scan in Docker Compose
In this scenario, we build an integration environment directly on the Bamboo agent and scan it using Docker Compose.
Create a new Bamboo build plan called “Scan Docker Compose”, and link it to your repository.
Configure the new plan as follows.
Task 1: Integration Environment
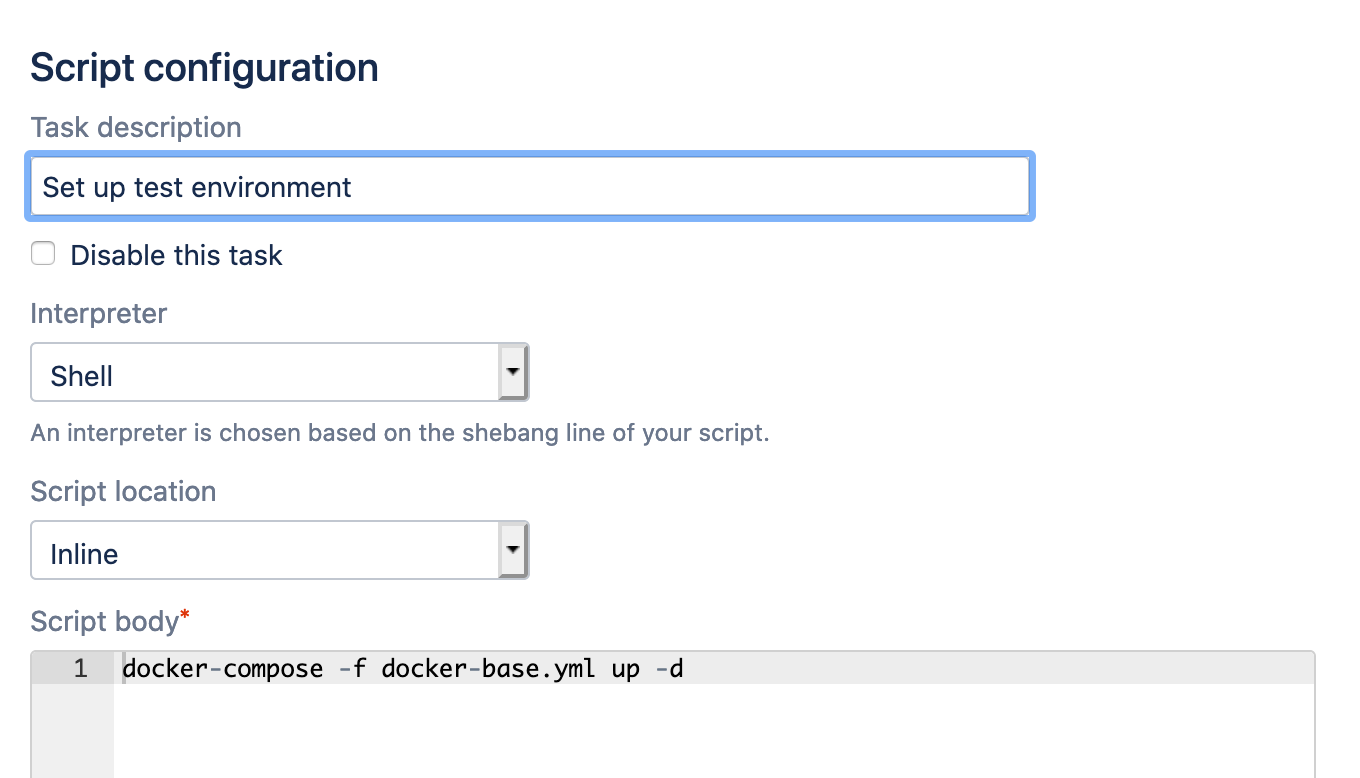
Create a new Script task with an inline shell script as follows:
docker-compose -f docker-base.yml up -d
The Docker Compose configuration docker-base.yml that we will create below will start up an Nginx container named nginx_test. This is our simple integration test environment.
 |
Task 2: Scan
Create a second Script task with an inline shell script:
docker-compose -f docker-base.yml -f docker-hawkscan.yml up --abort-on-container-exit
docker-compose -f docker-base.yml -f docker-hawkscan.yml down
In this script we are combining our simple docker-base.yml Docker Compose configuration with an overlay configuration, docker-hawkscan.yml. The overlay configuration will define the HawkScan container, which will scan the test environment in docker-base.yml.
Under Environment variables, enter HAWK_API_KEY="${bamboo.secret_hawk_api_key}" to pass your API key to HawkScan.
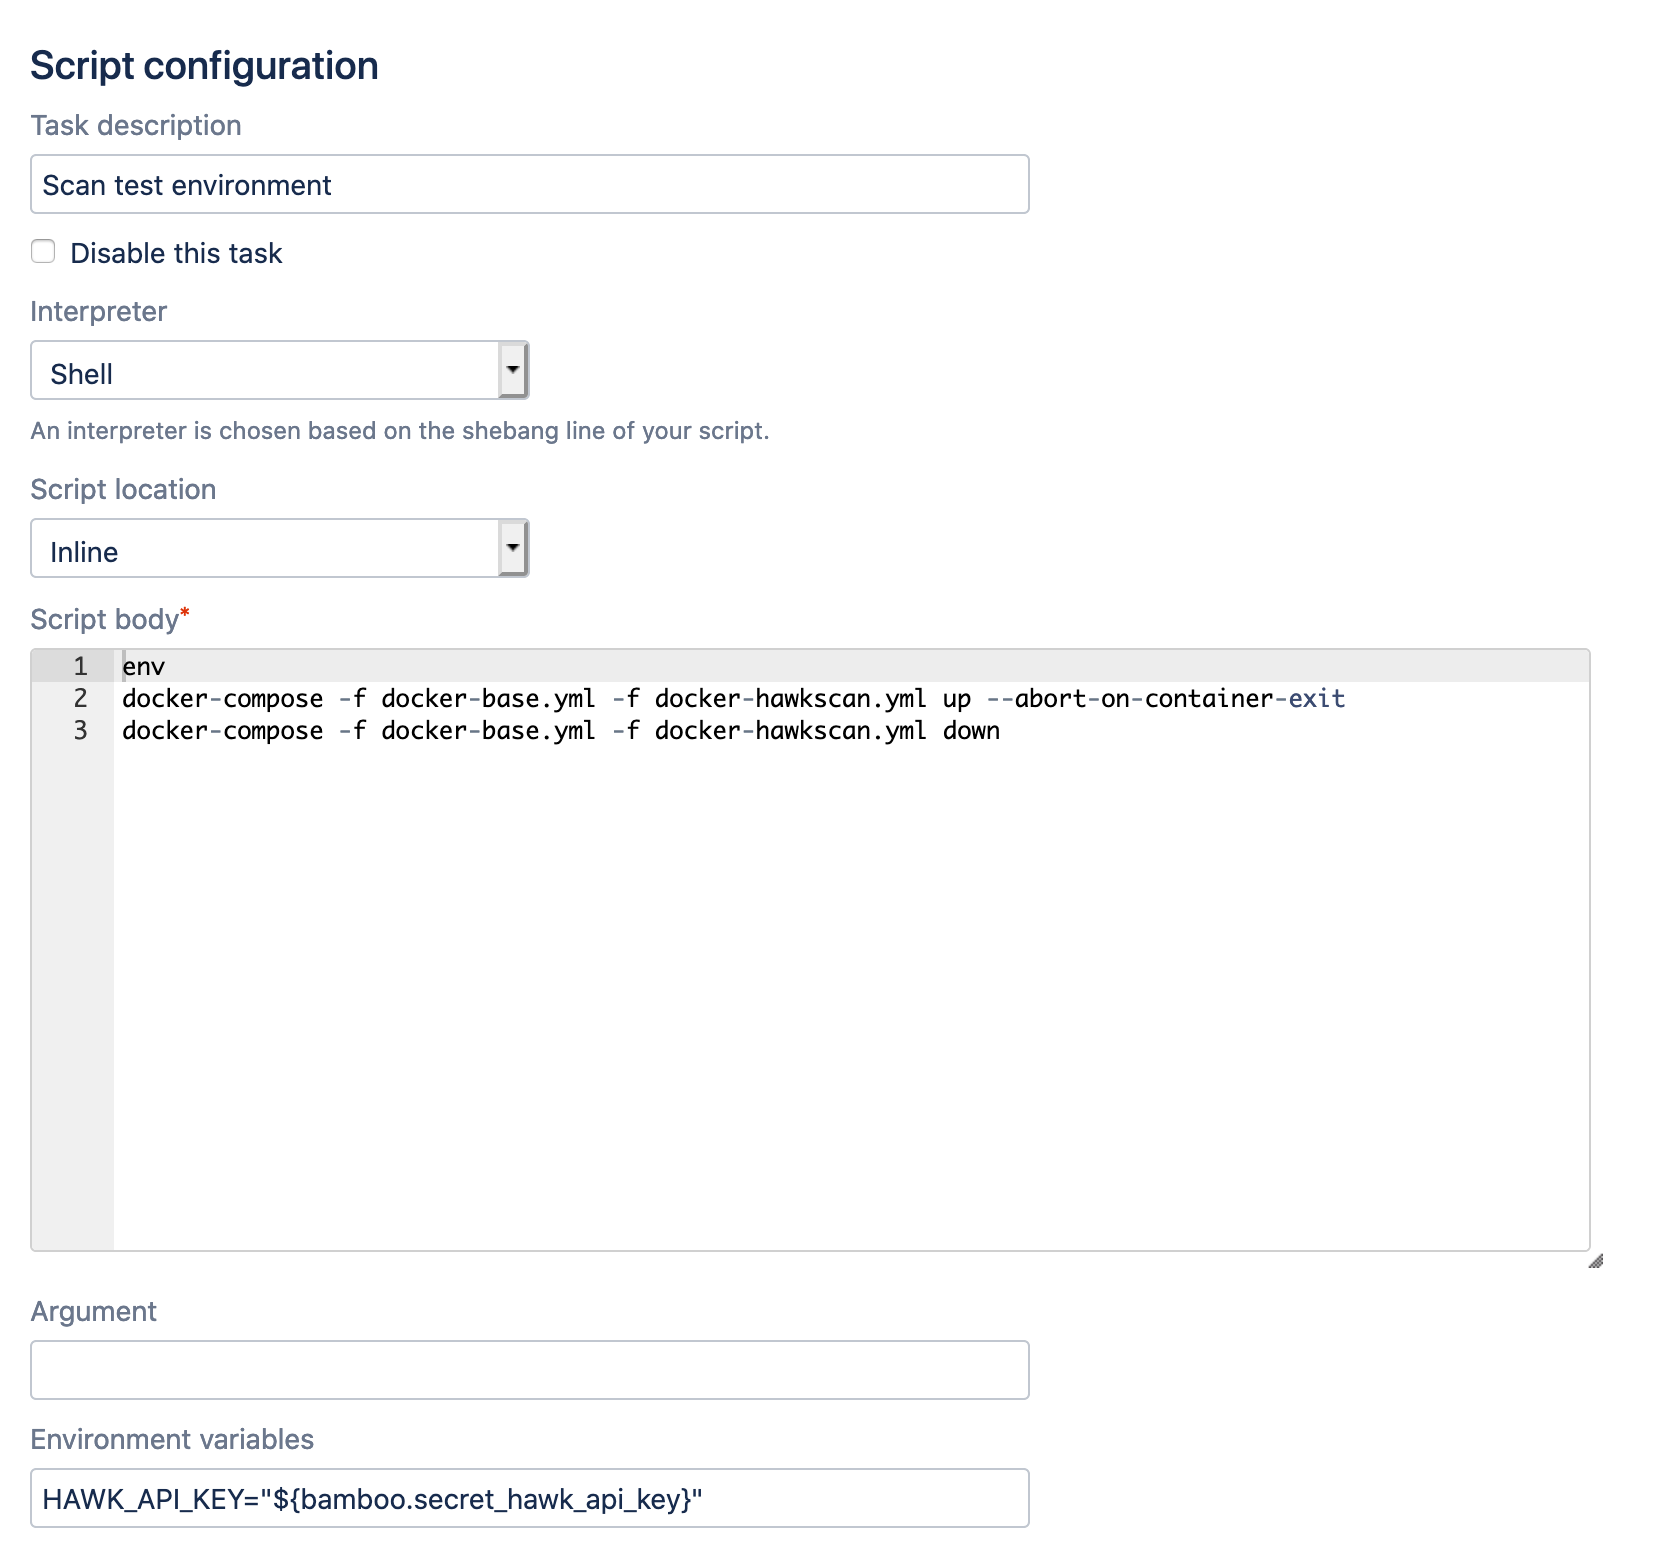 |
Notice that we use the --abort-on-container-exit flag to Docker Compose in this script. That tells Docker Compose to tear the whole assembly down when HawkScan completes.
Finally, the docker-compose ... down command removes all containers at the end of the scan.
Configure Docker Compose
The first Docker Compose configuration starts an Nginx container named nginx_test to be scanned.
docker-base.yml
version: "3.7"
services:
  # Fire up the app to test, nginx_test
  nginx_test:
    image: nginx
The second configuration runs HawkScan.
docker-hawkscan.yml
version: "3.7"
services:
  # Fire up hawkscan and scan the test app (nginx_test)
  hawkscan:
    image: stackhawk/hawkscan
    environment:
      API_KEY: "${HAWK_API_KEY}"
    volumes:
      - type: bind
        source: .
        target: /hawk
    tty: true
    depends_on:
      - nginx_test
Configure HawkScan
From the StackHawk app, navigate to Applications, and create a new application called Nginx.
In your test repository, create or modify your HawkScan configuration file, and add the following contents:
stackhawk.yml
app:
  applicationId: xxXXXXXX-xXXX-xxXX-XXxX-xXXxxXXXXxXX
  host: http://nginx_test
  env: Development
Replace the value of app.applicationId with the applicationId you just created in the StackHawk platform. Commit and push this change to your repository.
Run It
Run your new plan and watch the progress from the Bamboo console. You should see the HawkScan container run and print out a summary of results, including a link to your scan results in the StackHawk platform.
KAAKAWW!!
Check your scan results in the StackHawk app.
Docker Compose can be a powerful way to run HawkScan and other integration tests in your Bamboo pipeline. In a more realistic scenario, you can add dependencies to your docker-base.yml configuration, such as a database. After launching your integration environment in the first script step, you can add more script steps to run database migrations and seed data prior to running the scan.

