StackHawk Azure Extension

Running HawkScan from Azure Pipelines is easy with the HawkScan Azure extension, and requires the following steps:
- Install the StackHawk HawkScan Azure extension to your Azure DevOps Organization.
- Add or edit the
azure-pipelines.ymlconfiguration file in your application repository to run HawkScan. - Configure HawkScan with a
stackhawk.ymlconfiguration file and add it to your project repo.
Before you Begin
Before you can test your applications in Azure pipelines using the HawkScan Azure extension, you must first have the following:
-
To install the HawkScan Azure extension to your Azure DevOps Organization, you must have Project Collection Administrator permissions. Organization owners are automatically members of this group.
-
To run HawkScan, you must have a StackHawk account, a StackHawk API Key, and a Stackhawk application ID for your application.
NOTE: For instructions on generating a StackHawk API Key, see Get an API Key, and for instructions on getting an application ID, see Get an Appplication ID.
Install the HawkScan Azure Extension
To install the HawkScan Azure extension:
- Select Get it free.
- Select your organization from the dropdown menu, then click Install.
Alternately, sign into the Visual Studio Marketplace and install the extension from there.
For more information on how to install and uninstall Azure extensions, see Install extensions in the Azure DevOps documentation.
Configure Your Azure Pipeline with Tasks
The StackHawk HawkScan Azure extension simplifies integrating HawkScan tests into your Azure pipelines by providing the following two tasks you can use in your pipelines:
HawkScanInstall: This task will download and install a version of HawkScan. To select a specific version to install you can include the following optional input:version: the version of HawkScan that should be installed. By default, uses the latest version of HawkScan.installerType: one ofzip,msiorauto. By default, selects `auto which will use the .msi installer on windows and .zip installer on ubuntu.
RunHawkScan: This task will run HawkScan against your running application. It includes the following optional inputs and required environment variable:version: The version of HawkScan to run. If omitted, the latest version of hawkScan will run. This version need to match the installed version.repoDir: the directory containing your StackHawk YAML configuration file. If it is not included, the default is the current directory.configFile: the name of the YAML file with your HawkScan configurations. If it is not included, the default isstackhawk.yml.HAWK_API_KEY: the StackHawk API Key that is used by StackHawk to associate your scan with your StackHawk account. It is required.
At the base directory of your code repository, add the following configuration to your existing azure-pipelines.yml
file to configure Azure Pipelines to run HawkScan.
azure-pipelines.yml
trigger:
  - main
pool:
  vmImage: ubuntu-latest
steps:
  - task: HawkScanInstall@1
    inputs:
      version: latest
      installerType: 'auto'
  - task: RunHawkScan@1
    inputs:
      configFile: "stackhawk.yml"
      version: "latest"
    env:
      HAWK_API_KEY: $(hawk_api_key)
You need your StackHawk API Key available to your pipeline to run HawkScan. Azure offers multiple ways for you to set this variable and make it secret.
See Set variables in pipeline in the Azure DevOps documentation for more information.
Configure HawkScan
At the base directory of your code repository, create a stackhawk.yml configuration file. Then, add the following
bare-minimum configuration in the Development environment.
stackhawk.yml
app:
  applicationId: xxXXXXXX-xXXX-xxXX-XXxX-xXXxxXXXXxXX
  host: http://example.com
  env: Development
Before running HawkScan, replace the following in the configuration:
app.applicationIdwith your application IDapp.hostwith your application’s hostapp.envwith your application’s environment
Add, commit, and push this file to your Git repository.
For more information on the stackhawk.yml configuration file options, see configuration.
Run It
Now that you have edited your pipeline configuration file and saved your API Key as a secret Variable, Azure Pipelines will allow you to Review your pipeline YAML. Click the blue Run button, and watch your pipeline run.
When the HawkScan container runs, it prints some summary information to the screen when the scan is complete.
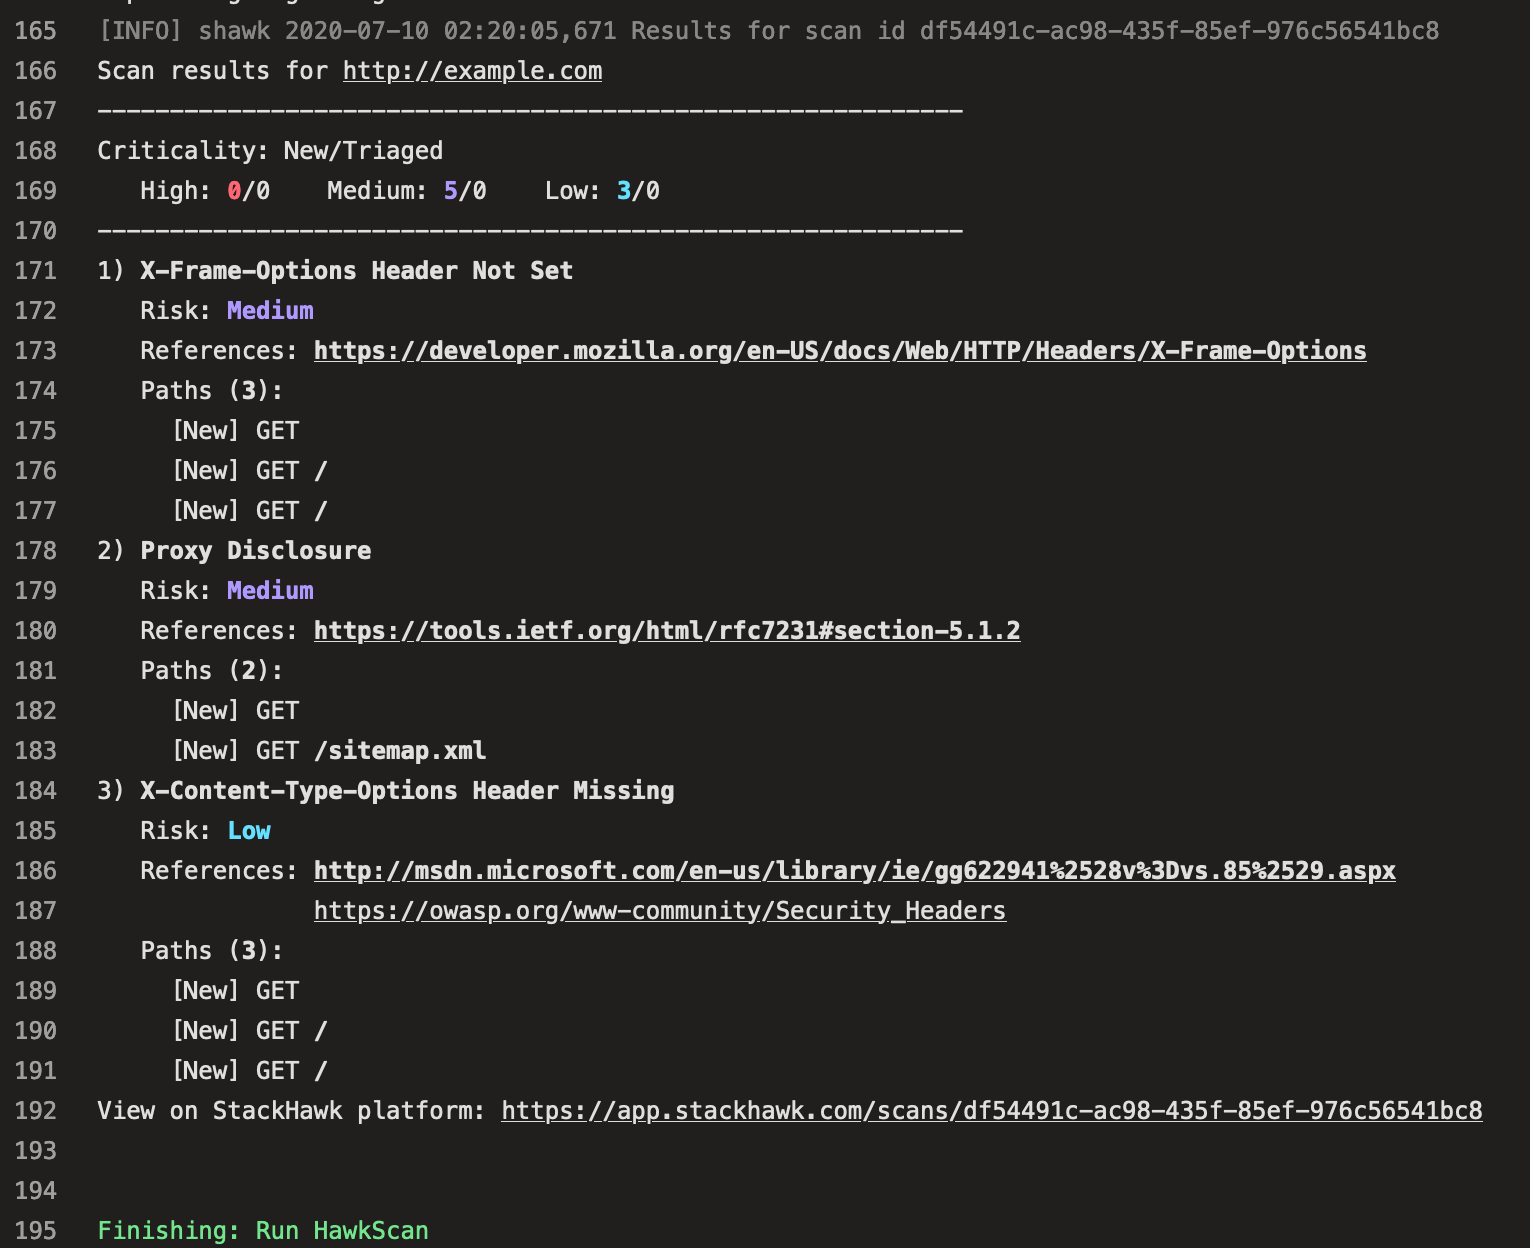
Check your StackHawk account for more details about your scan results {:target=”_blank”}.
Local Scanning Example
The previous example works great if you have an integration environment that is publicly accessible. But if you don’t have that, you can run your application and scan it directly on the Microsoft-hosted agents.
One way to test an application after building it is to launch it directly on the Azure Pipeline build VM, and scan it on the localhost address. Normally reaching a localhost address on the host with Docker can be tricky, but HawkScan inserts a proxy to translate it to the host address on the given platform. Because that proxy runs as an unprivileged user, your localhost application must listen on a port number higher than 1023.
The following example azure-pipelines.yml file launches a DVWA Docker
container listening on port 8080. Then you can scan the application at the localhost address. This method works with
any app you wish to scan, containerized or not, as long as it is listening on the localhost address, and on a port above 1023.
azure-pipelines.yml
trigger:
- main
pool:
  vmImage: ubuntu-latest
steps:
- script: docker run --detach --publish 9000:80 sagikazarmark/dvwa
  displayName: Start sagikazarmark/dvwa
- task: HawkScanInstall@1
  inputs:
    version: 'latest'
    installerType: 'auto'

- task: RunHawkScan@1
  inputs:
    configFile: 'stackhawk.yml'
    version: 'latest'
  env:
    HAWK_API_KEY: $(hawk_api_key)
The following is a modified HawkScan configuration pointing to the localhost address and port, http://localhost:9000.
stackhawk.yml
app:
  applicationId: xxXXXXXX-xXXX-xxXX-XXxX-xXXxxXXXXxXX
  host: http://localhost:9000
  env: Development
NOTE: when scanning the localhost address, you must scan ports above 1024. Internally, HawkScan creates an unprivileged proxy which cannot listen on low level ports.
When you commit and push this code to your repository, Azure Pipelines will run this job. The pipeline will launch DVWA, scan it with HawkScan, and post the results to your StackHawk scan list.