Jira Security

StackHawk’s official Security in Jira integration.
Overview
The Security in Jira integration will automatically send HawkScan findings to Jira Projects enabled with Jira Security Center.
Security in Jira enables existing Jira users to view all the vulnerabilities found by various security tools. StackHawk improved the existing Jira Cloud integration to support sending HawkScan vulnerabilities to the Jira security tab.
This integration works alongside the existing StackHawk Jira Cloud integration, and uses the same Atlassian marketplace addon. Enabling this integration also installs the StackHawk Jira Cloud integration.
Jira Cloud integrations can be connected to multiple Atlassian workspaces, but Security in Jira will only send results for the first connected Jira workspace to the StackHawk platform. Results will only send to Jira projects configured in the security toolchain, and enabled for the selected StackHawk applications and environments. Results are sent on subsequent StackHawk scans; historical scan results are not sent to Atlassian.
Features
- HawkScan findings will automatically be sent as vulnerabilities to the Security tab in Security-enabled Jira Projects.
- Vulnerabilities sent to Jira Security can be converted into Jira tickets within the Jira Security user interface, so findings can be tracked alongside other stories and bugs.
Requirements
StackHawk:
- You must have a StackHawk account.
- Your StackHawk Organization must belong to a plan with Security in Jira support enabled. Reach out to support@stackhawk.com to enable it.
- You must be on version 0.3.0 or above of the Security in Jira integration. See here for instructions on upgrading.
Jira:
- You must have login permissions to the Jira workspace you wish to add the integration to.
- You must have sufficient administration permissions to install add-ons to your Jira Cloud workspace.
- You must have the security tab enabled in your Jira project.
NOTE: If you are an existing user of StackHawk’s Jira Cloud integration, your installation of the integration needs to be upgraded in your Jira instance. See the instructions on upgrading your Jira Cloud installation
Scopes
With this integration you authorize StackHawk with the following Jira Cloud scopes:
- Read access to the connected Jira Cloud workspace
- Write access to the connected Jira Cloud workspace
- Delete access to the connected Jira Cloud workspace
Enabling the Security Tab
In order to enable the security tab in Jira:
- Navigate to a project.
- Go to Project Settings > Features.
- Under Development and next to Security, there will be a toggle switch. Click this toggle switch to enable Security in Jira.

- After clicking the toggle switch, the security tab should be visible in your Jira Project.
- If StackHawk’s Jira Security integration will be used across multiple projects, then this feature should be enabled in each Jira project.
Installation
Click here to install the StackHawk for Jira Cloud add-on from the Atlassian Marketplace
The StackHawk for Jira App must be installed and connected to a StackHawk organization.
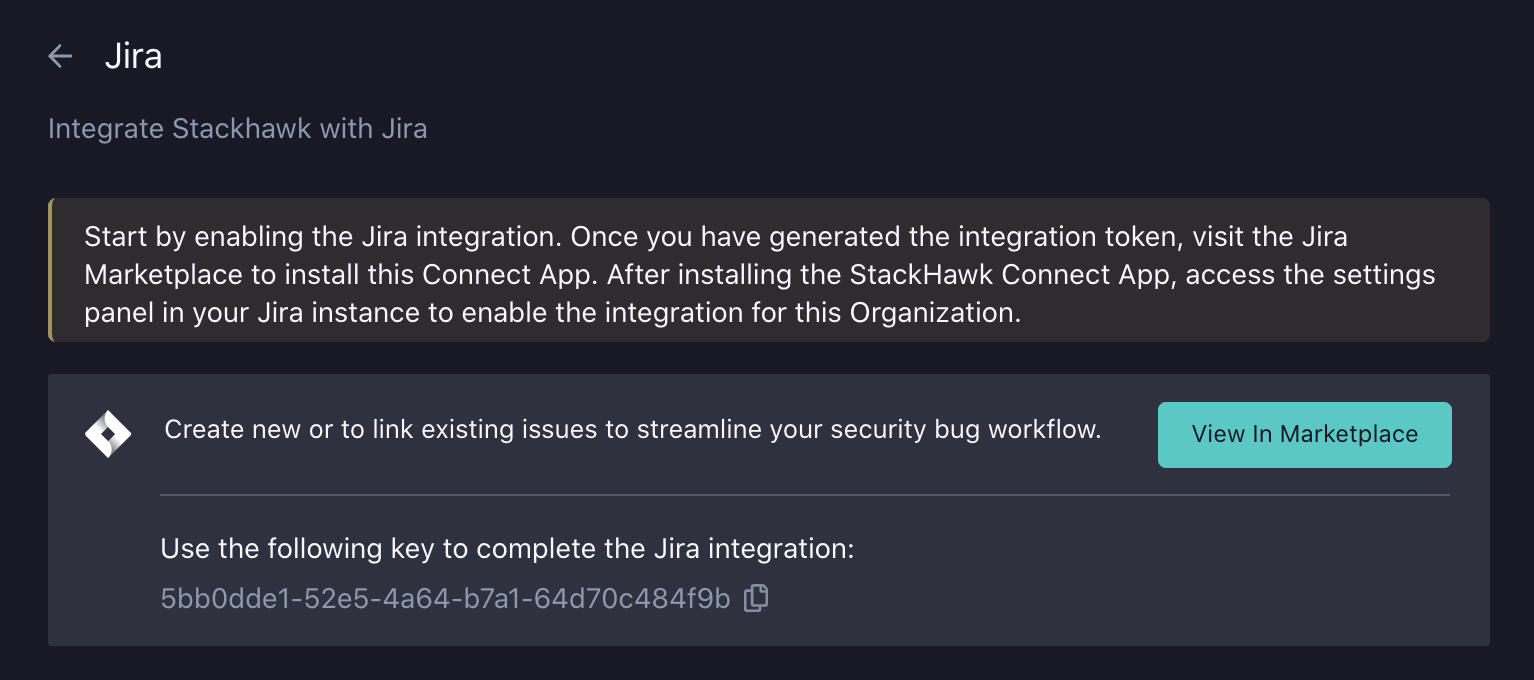
- Log into StackHawk and visit the Jira Cloud Integration page in StackHawk
- Click
Enable Jira. This will generate the temporary integration token. - Click the
View In Marketplacebutton. This will open a new tab to add the StackHawk add-on from the Atlassian Marketplace. - In the new tab, click
Installto add the app in your Jira Cloud workspace and go through installation process. Once completed, you can pressGet Startedto authorize the add-on with your Jira Cloud workspace.
Additionally, the app can be installed through the Jira Security tab. To install from the security tab:
- Navigate to a Jira project.
- Click the security tab in your project.
- Select StackHawk from the Connect tool dropdown
Only a single Jira Security integration needs to be installed for each StackHawk organization. Installation of the integration connects one StackHawk organization and one Jira instance, but allows for sending vulnerabilities to multiple Jira projects within that Atlassian workspace.
Token Authorization
Once the StackHawk add-on has been installed in Jira Cloud, a one-time integration token from StackHawk needs to be copied into Jira Cloud to connect the Jira Cloud Workspace with your StackHawk organization.
- After installing the app from the Marketplace, go to the Jira page in StackHawk.
- Copy the UUID integration token. Note: this key is time-sensitive, and will expire after one hour.
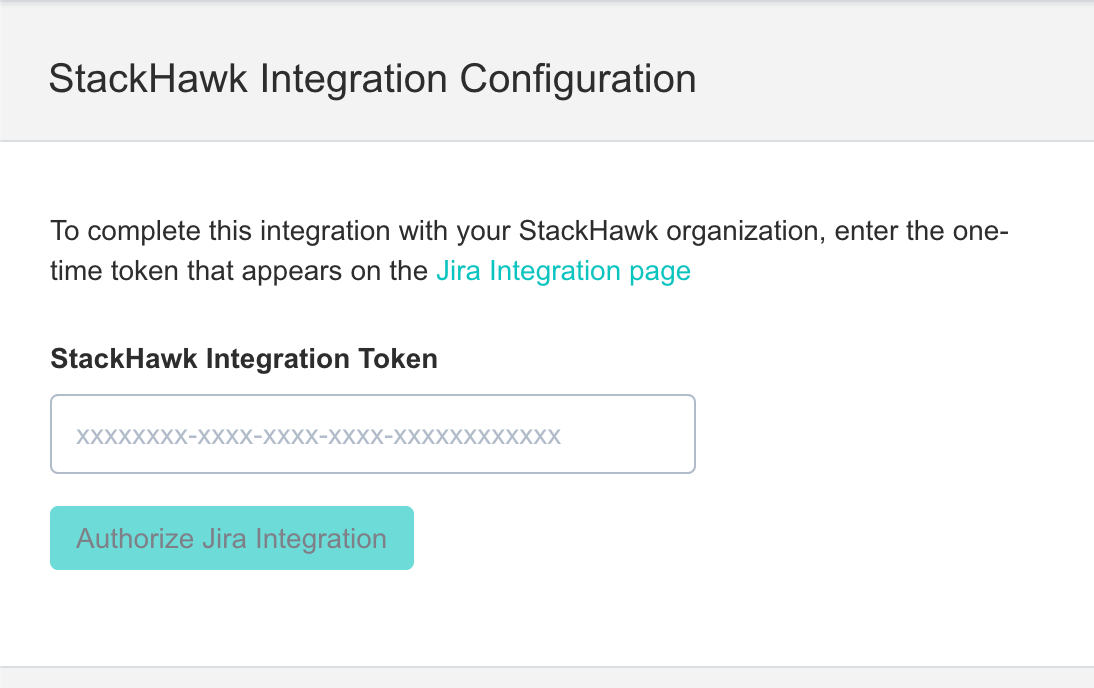
- In Jira Cloud, go to
Apps > Manage Your Apps > StackHawk for Jira > Get Started. - Paste the integration token into the
StackHawk Integration Tokenfield. - If successful, your Jira Cloud workspace will now be connected to your StackHawk organization, and the integration completed.
Verify Installation
You can verify the Jira Cloud App installation at any time after configuring a integration token.
- Go to the Jira Security page in StackHawk.
- You should see a
Connected to: <your workspace URL>, which indicates the integration has been linked to that Jira Cloud Workspace.
Configuration
The applications and environments which will send their vulnerabilities to Jira are configured from both the StackHawk platform and from the Jira Project security tab. This setup is a manual step to ensure that administrators have control over their vulnerabilities data and that sensitive data is not inadvertently sent without the administrators knowledge.
To configure Jira Security:
- Navigate to the integration page on the StackHawk platform, then the Jira Security tile.
- Click the “Add Connection” button, which will bring up the Add Connection modal
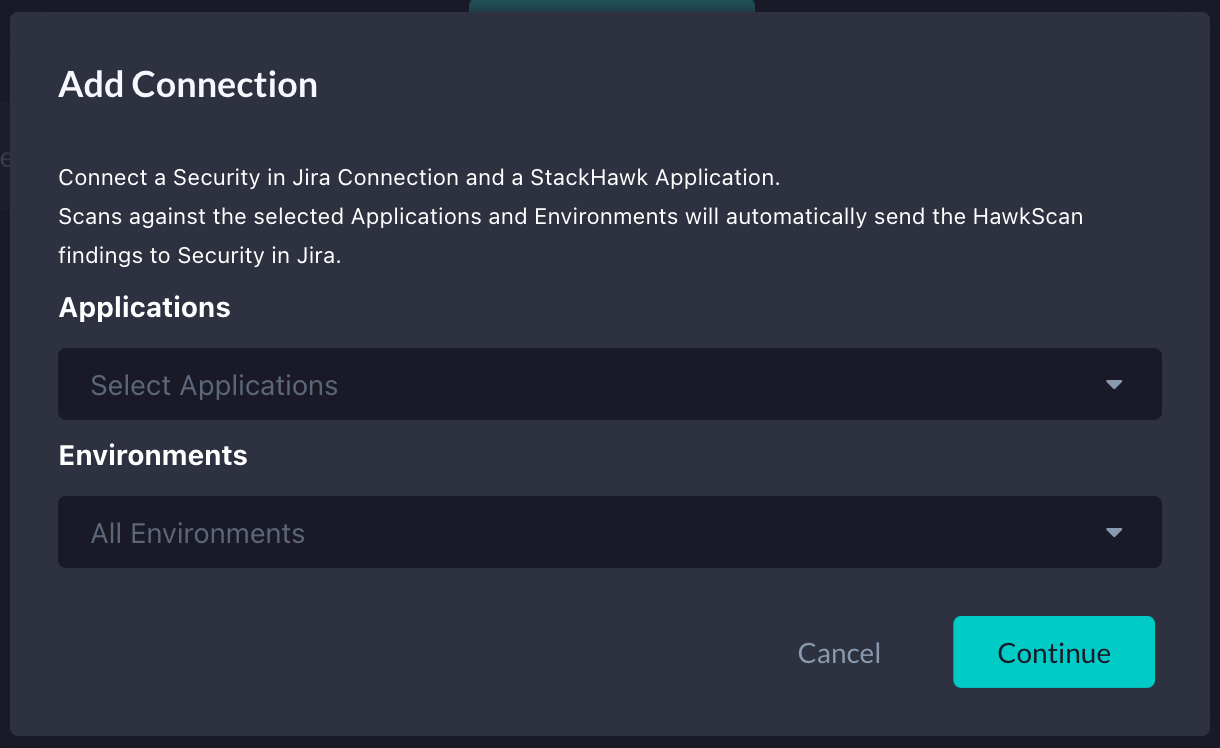
- In the modal, select the applications and specific environments whose scan results should be sent to a project’s security tab. If you would like all scan data in this organization to be sent to Jira, then select “All Applications” and “All Environments.”
- Finish by clicking the “Continue” button. The configured applications and environments will send scan result findings to the Jira Security project tab.
Adding Security Containers to Projects
In order to associate the scan results from applications and environments to the security tab of specific projects, those applications/environments must be added as security containers to those projects. A Jira Security container represents a StackHawk application & environment. To do this:
- On a project settings page, navigate to the Security tab.
- If a section for “StackHawk for Jira” does not appear here, then it may be necessary to add it to the toolchain page. This can be done by clicking the “Add” button in the top-left corner and clicking “Add security container.” A selection will appear with an option to add “StackHawk for Jira” to the toolchain. Running a StackHawk scan for the configured application and environment should also toggle the StackHawk security workspace from showing here if it’s not already present.
- Once the “StackHawk for Jira” section is visible, click the plus(+) icon which will show available security containers from StackHawk to send results to.
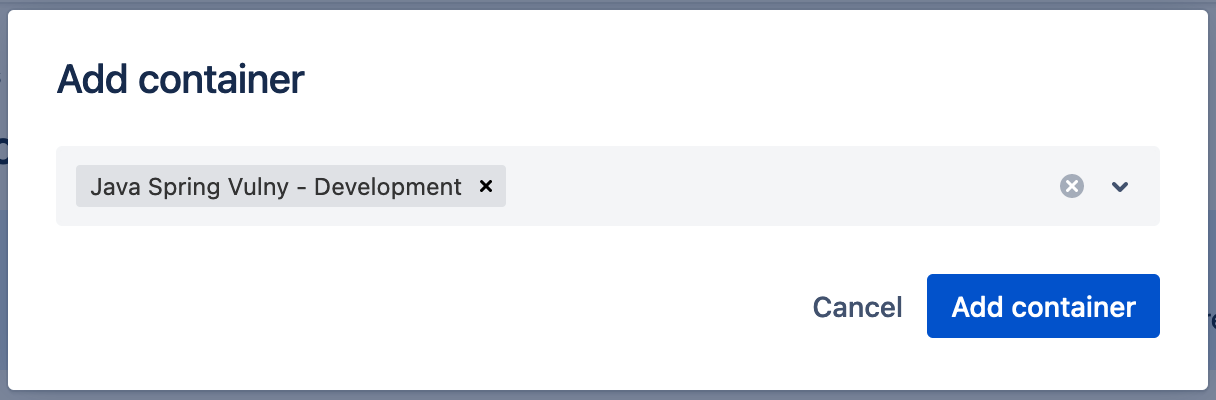
- The container will then be added to the project, making any vulnerabilities sent for that application and environment visible on the project’s security tab. Vulnerability information may not appear right away.

Vulnerabilities in Jira
After a connection between the application/environment and Jira has been established from the Jira Security tile in the StackHawk platform and the security container has been added to the project, any new scans that are run against those applications/environments will sent their scan results information to Jira in the form of vulnerabilities. After running a scan, vulnerabilities will be visible on the Security in Jira page.
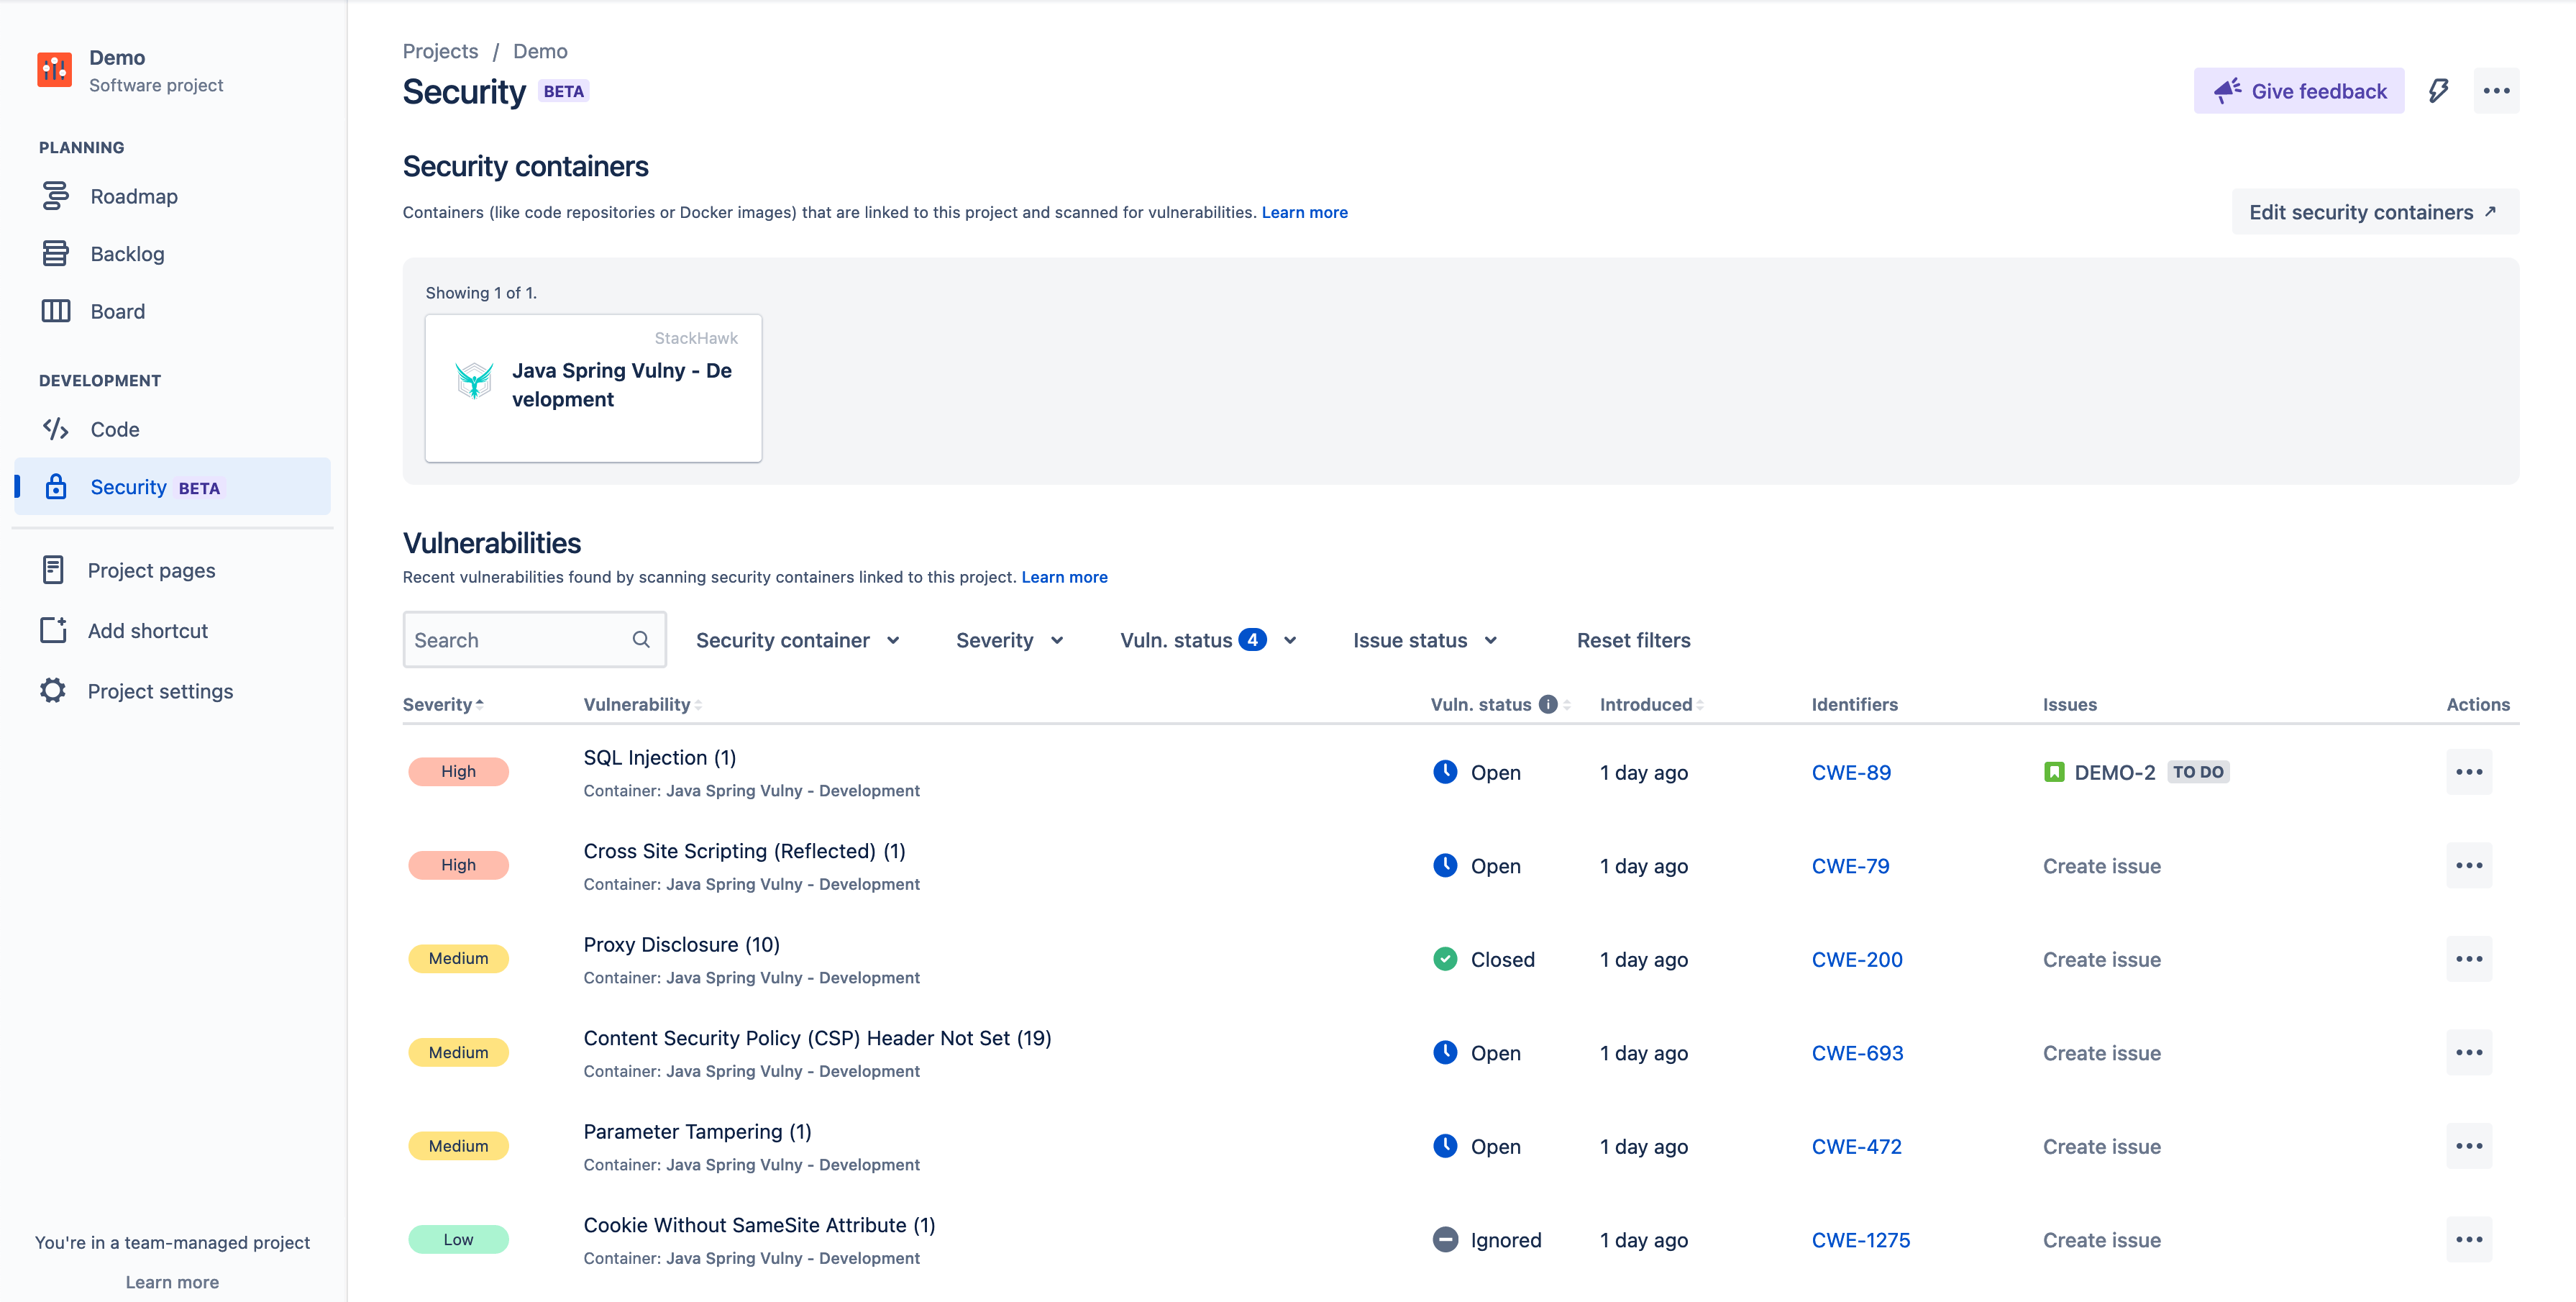
On the Security in Jira page, security containers are listed at the top of the page. Vulnerabilities are listed in the bottom section and can be sorted by several characteristics such as by security container, severity, vulnerability status and issue status.
Data from HawkScan is represented on this page in the following ways:
- High/medium/low criticality alerts will translate to vulnerability severity
- The name of StackHawk findings from the findings page will be show on in Jira as the vulnerability names, including a count of the number of vulnerable paths
- Scan findings from the most recent scan will be shown as “Open” vulnerabilities.
- When a vulnerability was not found in the latest scan, the vulnerability will be marked as “Closed” in Jira.
- Vulnerabilities with at least one path that has not been triaged will remain open. For vulnerabilities whose paths have all been triaged, the vulnerability status will be set to “Ignored.” Triaged in this context means that the path has been marked with the “False Positive” or “Risk Accepted” triage statuses in the StackHawk platform. See more information on triage statuses.
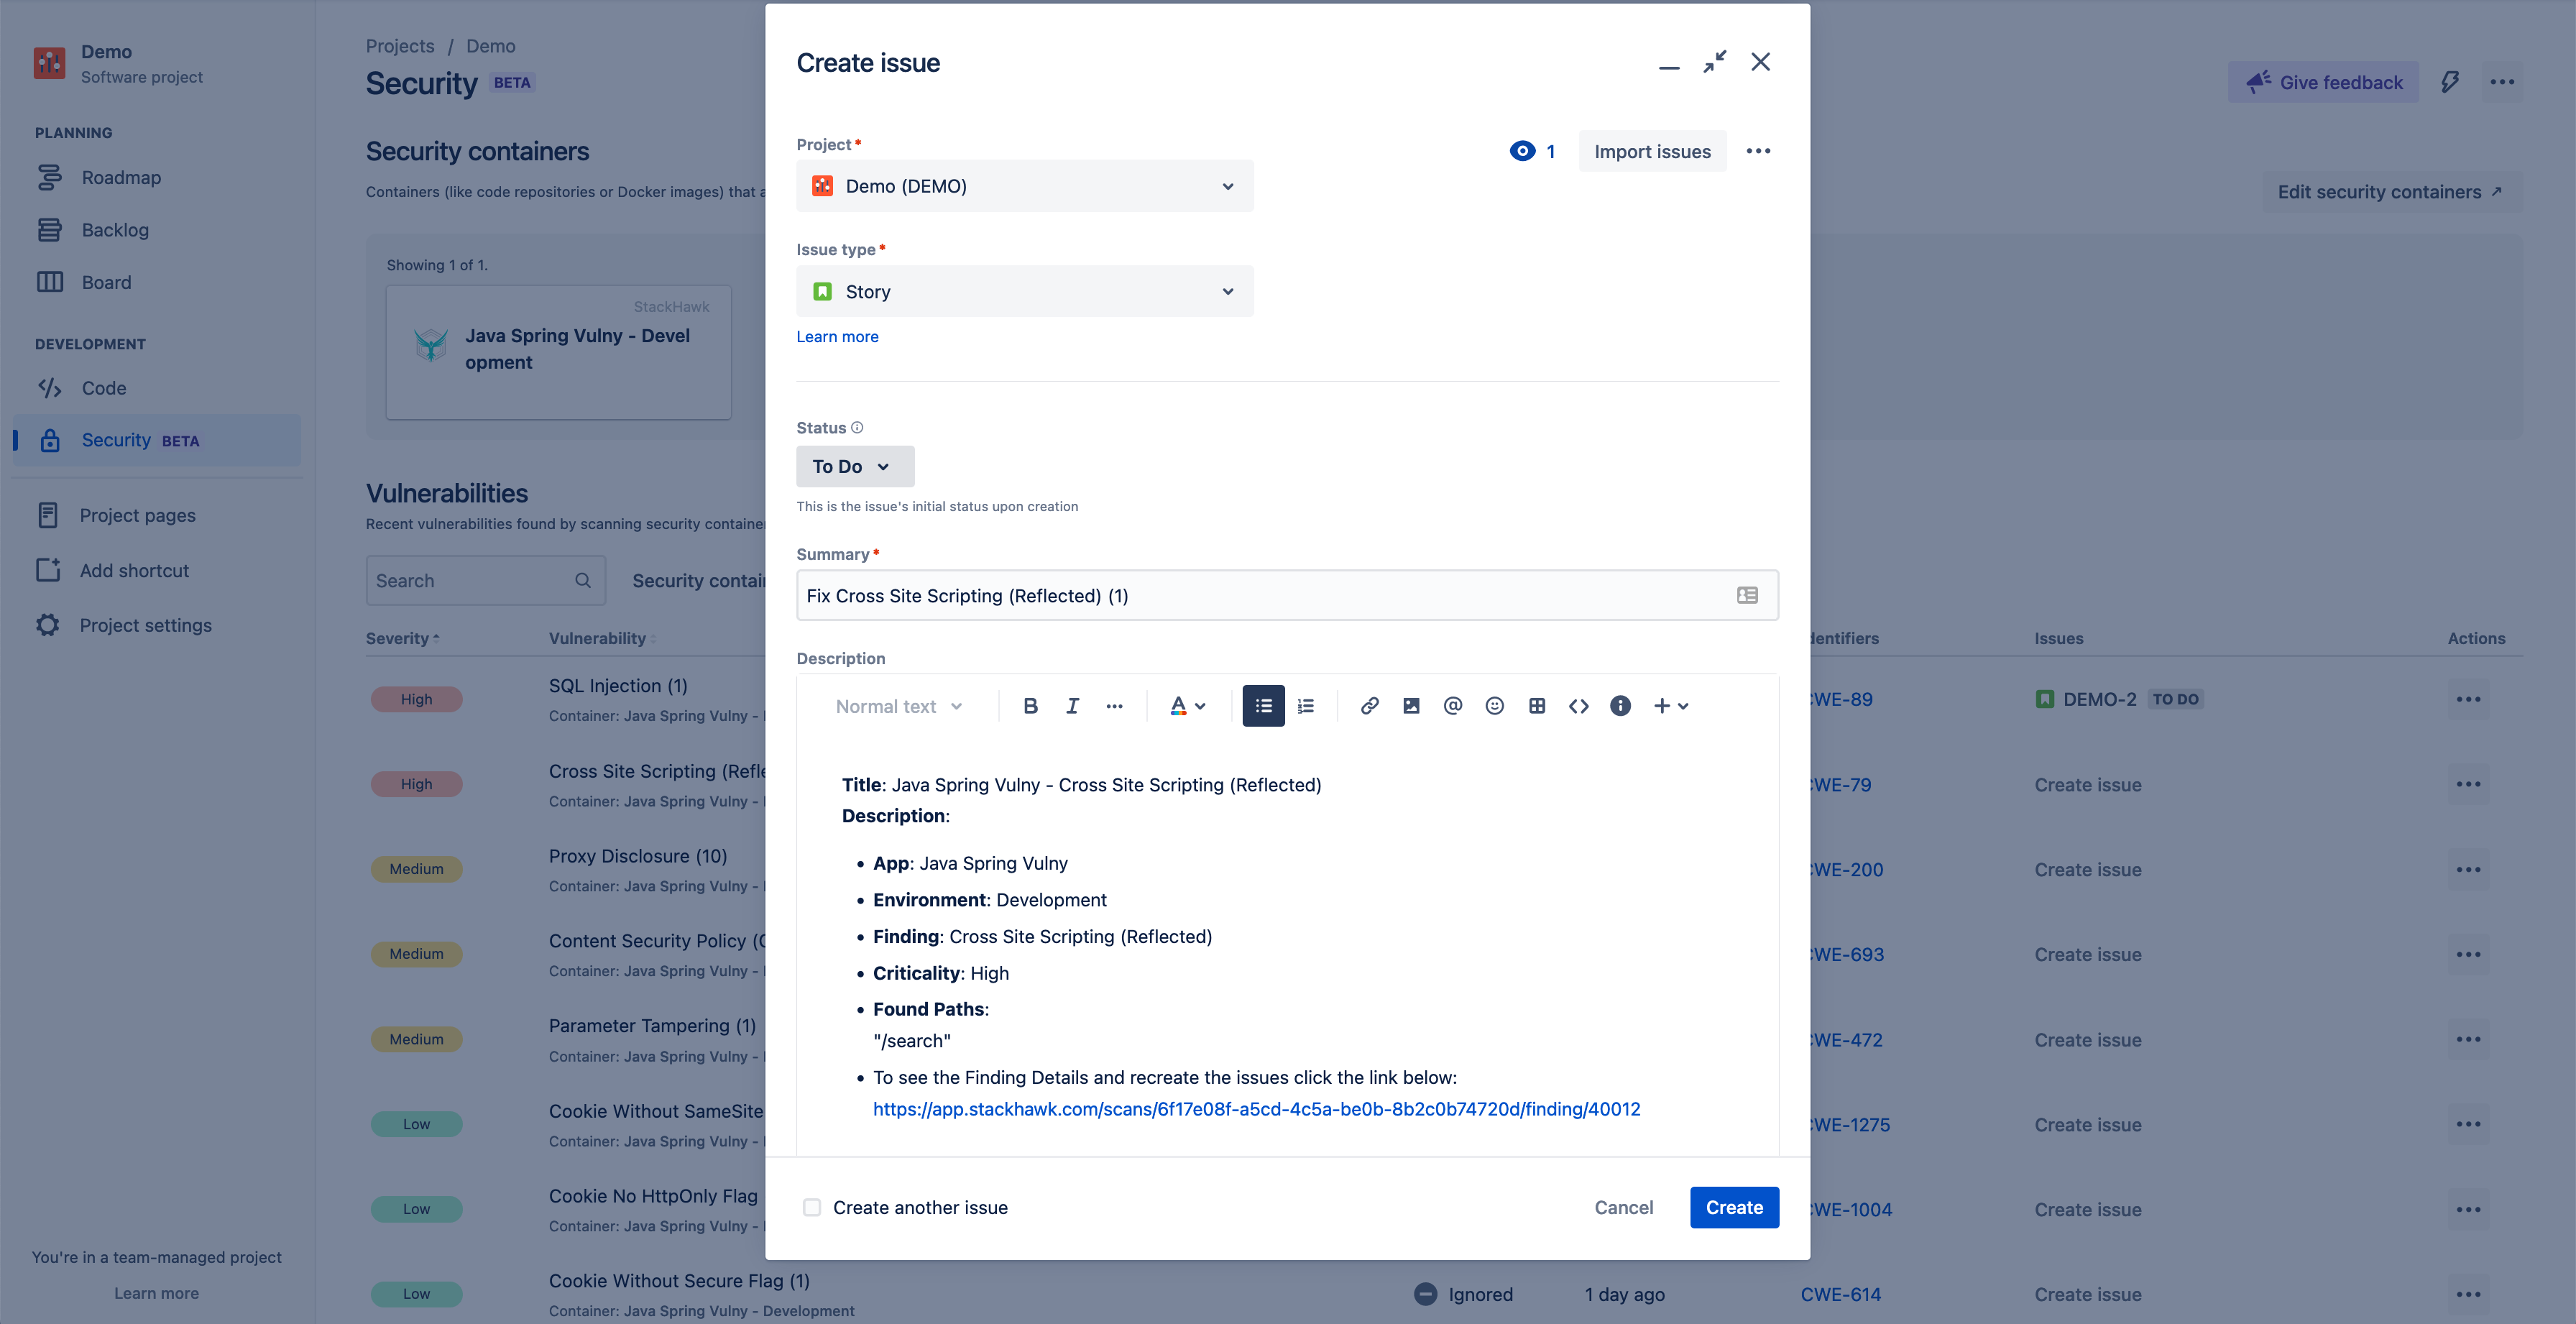
Creating Jira Issues from Vulnerabilities
From Security in Jira, Jira issues can be created based on the vulnerabilities sent from StackHawk. Under the “Issues” column for each vulnerability is a “Create issue” button. Clicking this issue will open a modal with prefilled information about the vulnerability. This includes a description of the vulnerability with information generated by StackHawk.
Linking Jira Issues from the Security Tab
Jira issues created from the security tab in Jira can now be linked back to findings in the StackHawk platform. The creation of Jira issues from the security tab will automatically associate between the issue created for a vulnerability and the paths of the corresponding scan finding on the StackHawk side. The paths under the finding will be tagged with a Jira issue key and a link to the Jira issue.

Finding paths that have associated Jira issues will be considered triaged and will have the status of “Assigned.” Finding paths that have been triaged previously with another status such as “False Positive” or “Risk Accepted” will keep their existing statuses. If an issue is unlinked from a vulnerability on the security tab, this will result in the disassociation between the issue and any linked finding paths on the StackHawk side. Those finding paths will move back to an un-triaged status (“New”).

To enable this linking/unlinking functionality, it is necessary to upgrade the installed version of the integration to 0.3.0 or higher. See the instructions on upgrading the Jira integration.
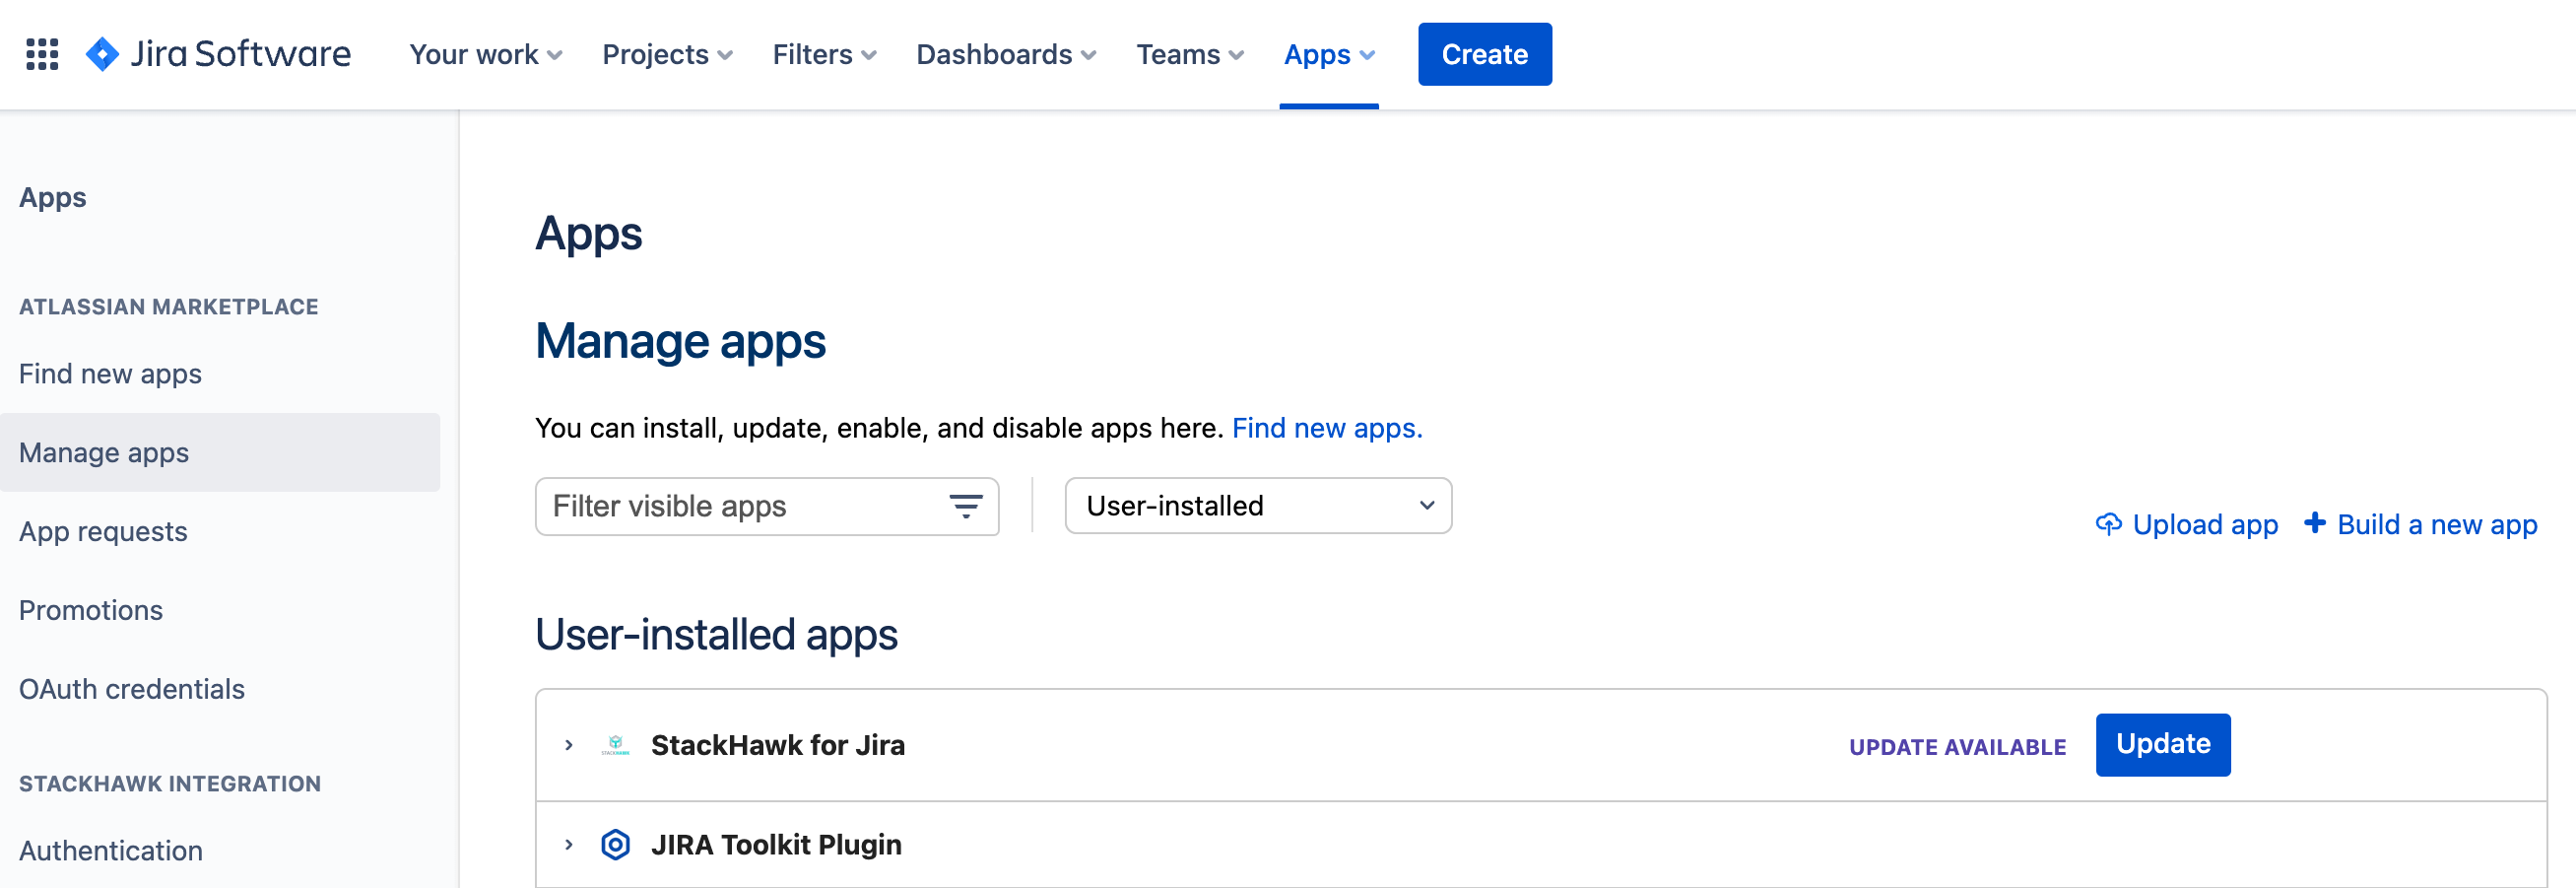
Update the Existing Installation
Existing users of the StackHawk for Jira addon must first update the addon to the latest supported version to enable support for the Security operations tab. If an update is available, a button to update the addon to the latest version will be visible from the Apps Management pane.
Removing the Security in Jira Integration
The Security in Jira integration can be disconnected from the StackHawk platform, or from the Security in Jira Integration page.
- Go to the Security in Jira Integration page in StackHawk.
- Click
Remove Integration - From your Jira Workspace, go to
Apps > Manage Your Apps > StackHawk for Jira - Click
Uninstall
Feedback
Have suggestions or feedback? Contact StackHawk Support.